

There are around 12-24 million eCommerce stores in existence today with around 75% of the global population using some form of eCommerce outlet at least once a month.
It’s estimated that by the year 2040, around 95% of all purchases made will be online so it’s hardly surprising that eCommerce start-ups are on the rise.
But how do you go about starting an eCommerce store? Firstly, you need a good website with eCommerce functions and features. That’s why Squarespace is such a popular choice with entrepreneurs. If Squarespace is your platform of choice, then read on for how to get started.
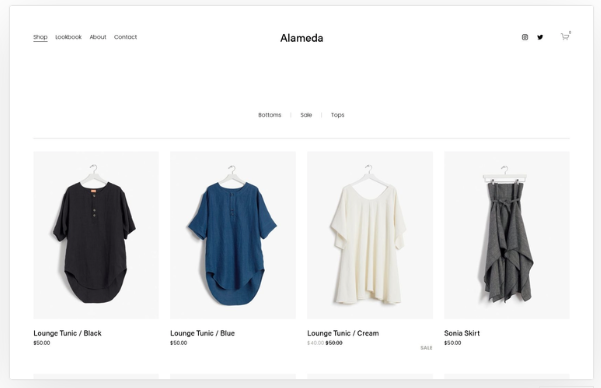
Step 1: Choose an eye-catching commerce template
To attract and convert as many customers as possible on your eCommerce store, you’ll need to choose an eye-catching commerce template that not only looks good but is also easy to navigate. Almost every template offered by Squarespace provides the essential features you need for an eCommerce store, but the kind of template you require will be determined by the items you intend to sell, your customers and your brand image. Click the link below to start viewing the Squarespace commerce templates.
Squarespace Commerce Templates
Once the template is selected, it’s time to build out your website and bring your eCommerce store to life. If you’re new to website design, Squarespace have created a handy guide explaining how to build a website. Unlike some of the more complicated website builders, Squarespace uses a grid-style format with drag and drop blocks.This makes it a popular alternative to WordPress and code-based site builders.
Helpful Tip: Before you start designing your eCommerce store website, create your brand guidelines. Create your logo, brand colors, fonts and typography preferences. This will help to ensure your brand becomes instantly recognizable as you grow and maintains a consistent identity.
Step 2: Add your products!
Squarespace allows you to sell any type of item through an online store including digital products, subscriptions, services, gift cards and physical items. No matter what you intend to sell, you’ll want to make sure they stand out. For product-based stores, it’s well worth investing in some professional photography to be sure each item looks at its best. For digital products or services, you’ll need to be a little more creative to stand out from the competition. If you don’t have a huge budget, why not consider an amateur or student photographer who may be looking to expand their portfolio?
For general images to be displayed around your site, Squarespace has a handy stock image tool where you’ll be able to take advantage of millions of images to bring your store to life.
Once your product images are uploaded, don’t forget to write captivating product descriptions to really sell your items. Great product descriptions not only help with conversions but can also help with SEO too, so be sure to include keywords and important information such as features and specifications. Products in any online store should also be organized in a way that makes it easy for users to find what they may be looking for.
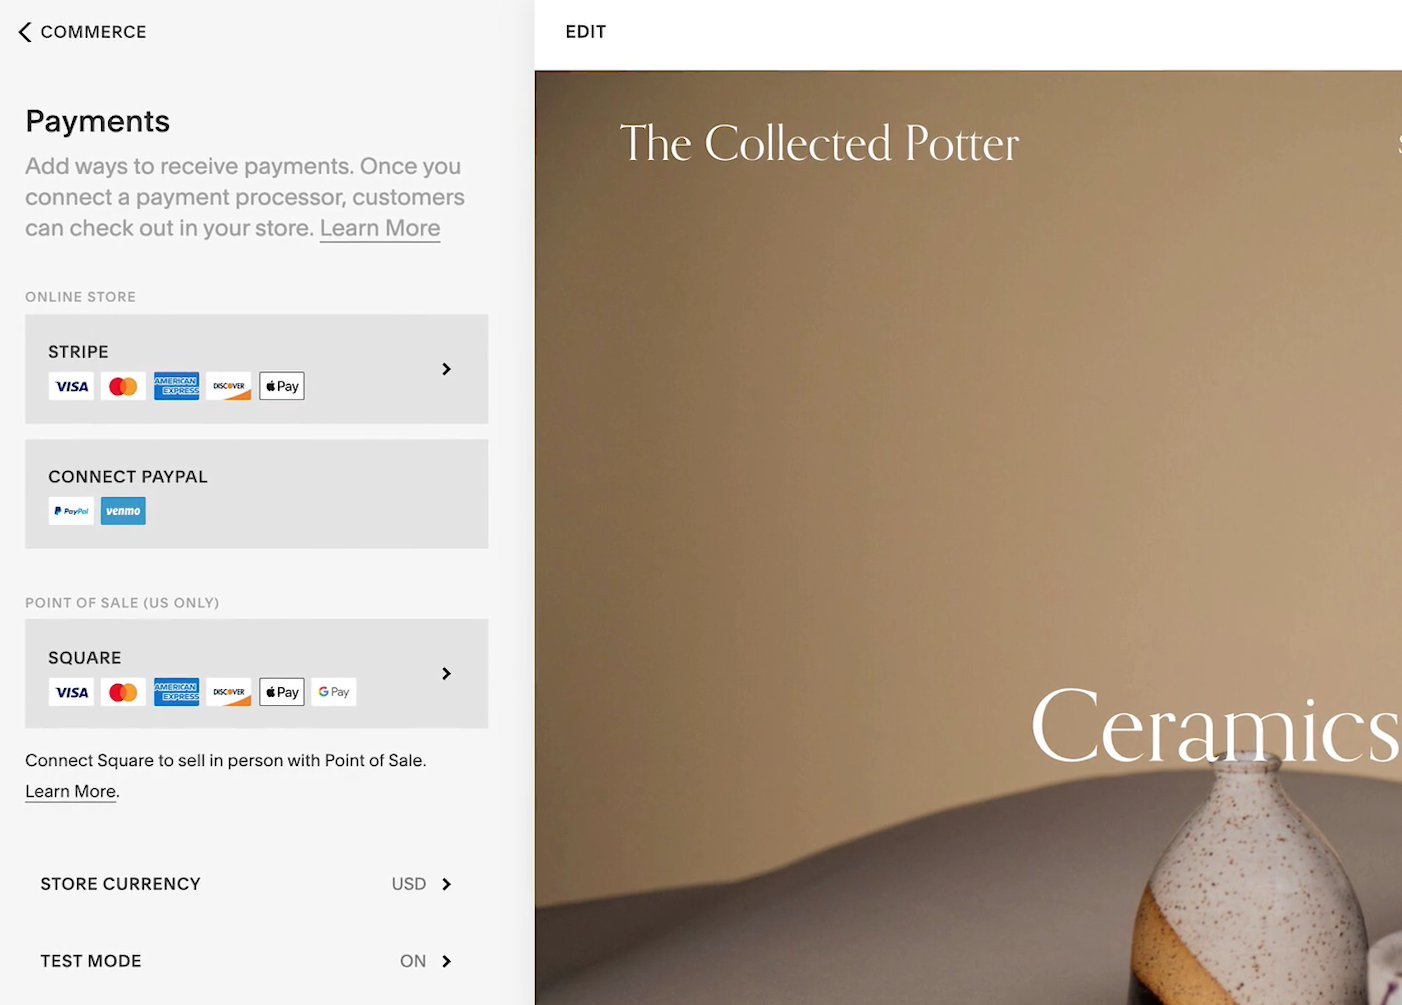
Step 3: Attach a payment processor
With Squarespace, you don’t need to worry about complicated payment processors. The platform supports almost all of the popular and most used payment processors for generating online sales including PayPal, Apple Pay and Stripe. For in-person (in-store) sales, Squarespace sites also support Square.
You can have as many payment processors as you want or need on your online store to provide customers with a wide variety of options. If your store is operating in multiple countries, you’ll need to ensure your chosen payment method works well in those locations.
Step 4: Find a shipping option
If your store will be selling physical products, you’ll need to offer shipping options and implement any shipping partners in advance. Choosing the right shipping options will largely depend on the types of products you are selling online, their costs and the time constraints involved. The most common shipping options include flat rate shipping, free shipping, carrier calculated or rates by weight.
Step 5: Don’t forget to configure taxes
When you build your eCommerce store on Squarespace, you’ll benefit from a number of in-built tools to help simplify the tax process. You’ll be able to create tax rules for the countries, states, provinces, and ZIP Codes where you ship products. This guide covers how to manually enter your store’s tax rules.
Step 6: Tell the world about your new store
Once your eCommerce store is set up and ready to go on Squarespace, it’s time to tell the world and gain new customers. Social media is one of the most effective marketing tools used by stores today with around 3.96 billion users worldwide. But there are many other ways to get the word out. You could issue press releases to news sites, team up with other established stores or brands to run a contest, or attend an event. Put simply, the more people that know about your store, the more customers you’ll acquire. Don’t forget to check out our 35 ways to turbocharge your eCommerce marketing.
Step 7: Use the Squarespace Commerce app
Track the success of your online store from anywhere in the world using the Squarespace Commerce app. Square is integrated into the app too, so you’ll be able to easily take card or cash payments if making sales remotely or in store. Once a customer’s payment has been processed through Square, you’ll receive funds in your account automatically. It’s worth pointing out that this feature is only available to those with Apple iPhones right now.
Step 8: Track overall performance with Squarespace Analytics
Tracking performance is an integral part of running any business but it’s particularly important for an eCommerce store. By tracking performance you’ll be able to shape the future of your store in a way that you and your customers really want.
Squarespace’s reporting platform Squarespace Analytics is really easy to use and provides store owners with a variety of insights in one simple dashboard.
Step 9: Start collecting customer reviews and feedback
Customer reviews are a hugely important part of the buying process in today’s digital world, so you’ll need to ensure your new eCommerce store is ready to start gathering reviews and feedback as soon as you start making sales. HelpfulCrowd is one of the best and easiest ways to collect content rich product and business reviews. What’s more, by using this user-generated content in key areas across your store and marketing channels, you can help increase traffic and turn more visitors into customers. HelpfulCrowd seamlessly integrates with Squarespace, so you’ll be ready to collect and display verified reviews on your site.
Sign up for a free demo today.